 YouTube!
ORAC Power Control
From my adventures with the delta printer, I was already familiar with OctoPrint’s PSU Control plugin. I was originally thinking that I would put in a couple cheap relays, similar to what’s in the Kossel, to allow me to switch mains power to the 24V brick and the motor controller. The more I thought about it though, the less I wanted to be splicing and running AC wires all over the place inside the cabinet. I did, after all, get rid of the high voltage VFD and such to avoid exactly this. Instead, I started looking for an industrial lego – an all-in-one block that would take logic input from the Raspberry Pi and safely switch a couple standard outlets.
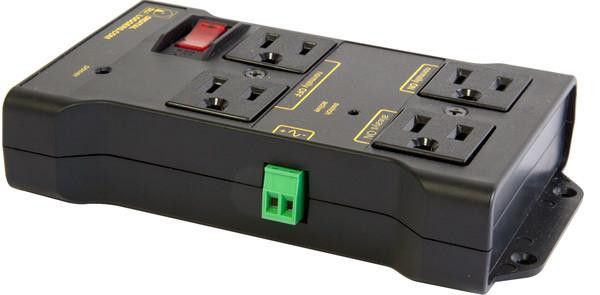
After some searching, I stumbled upon what the manufacturer calls an IOT Relay. The brick has a very flexible logic input, two Normally Off, one Normally On, and one Always On outlet. Additionally, it has a 12A breaker on the input, so that’s one less fuse I have to splice in as well. This this is basically tailor made for what I’m doing here. In my setup, it looks like this:
| Always On | Raspberry Pi |
| Normally On | Cabinet Lights |
| Normally Off | MC2100 Motor Controller |
| Normally Off | Mean-Well 24V Brick |
I like this configuration because I know if the lights are on and I can see to poke around inside the cabinet that the high voltage components are disconnected from the mains. It’s worth noting that the V1 of this device had two Normally On instead of having the Always On. This meant that you had to find another power source for the controller doing the switching. It also didn’t have mounting tabs, which isn’t a big deal for me, but was a big deal for some others. If you’re looking to replicate my setup, make sure you get the V2.
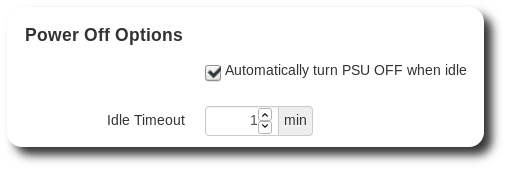
For automated safety, I configured PSU Control to turn off the high voltage kit after 1-minute idle. I can’t think of a situation where I would want the machine sitting power up but not moving for more than one minute. If this winds up being annoying in practice, I’ll increase it. Looking at how things tend to go with the Kossel, though, I’ll more likely shorten the (currently 15-minute) timeout on that one than lengthen the timeout here.

For some added manual safety, I added a flight switch in-line with the logic output from the Pi. Both the flight switch and the RasPi / PSU Control have to have to be “on” for the relay to kick the high voltage on.
Bill of Materials
- IOT Relay (Also check out Digital Loggers in general – they look like fun folks to work with.)
- Raspberry Pi
- MC2100 Motor Controller
- LED Light Bars (I’ll probably replace these with flexible strip lights at some point in the future.)
- Mean Well 24V 10A Brick
- Flight Switch
- 50cm Jumper Wire
- Heat Shrink
- Ring Terminals