Kossel Fire Postmortem
Introductory Asides
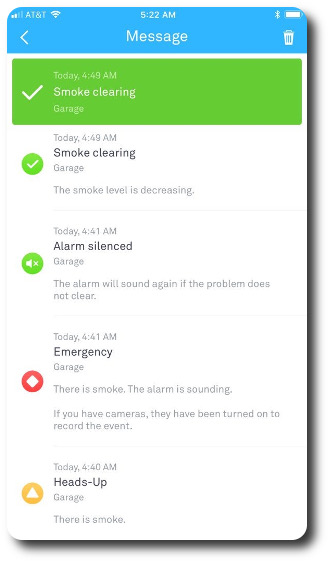
A couple evenings ago, my wife and I were woken at 4:41am by “Heads Up! There is smoke in the garage.” from a calm robot lady in the ceiling. At risk of sounding like a shill, I can honestly say that our Nest Protects saved our house and potentially lives. First off, our house didn’t have any smoke detector at all in the garage when we moved in and a fire starting in the garage would basically have to burn down the whole front of the house before it would wake up someone in the master bedroom. Even if it had a traditional stand-alone smoke alarm, we probably wouldn’t have heard it in the bedroom due to the garage being pretty effectively sealed off from the house proper. A smoke alarm wired into a traditional whole-house beeper system would have woken us up, but cost valuable minutes searching around the house for the cause of the alarm. I felt like a bougie San Francisco knob when I put the Nest Protects in, but now I feel like they were worth every penny. Seriously, I don’t care if it’s a Nest system or one of the knock-offs, but really, get yourself a connected smoke alarm system that can tell you where the problem is. It’s worth it.
Next up, blame. I blame myself for 99.99% of this incident. There were safety precautions that I could have taken and didn’t. (See Lessons Learned.) The remaining 0.01% of the blame, I share with BIQU. BIQU deserves some responsibility because there are no fuses designed into their Kossel Plus Kit at all. If anything shorts out, at best, you’re going to destroy your control board. At worst, you’re going to burn your house down and kill everyone in it.
I don’t know if the safety mechanisms in the Smoothieboard knockoff worked properly or not because I lost all the history when I unplugged the burning printer. I can tell you 100% positively that this fire was not caused by a flaw in the genuine Smoothieboard because my genuine board sits on my bench as a test harness while the throw-away clones are in the machines where they’re more likely to burn out.
Looking at the Evidence
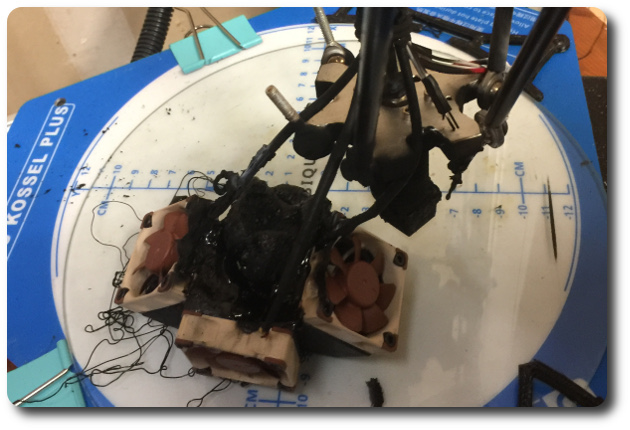
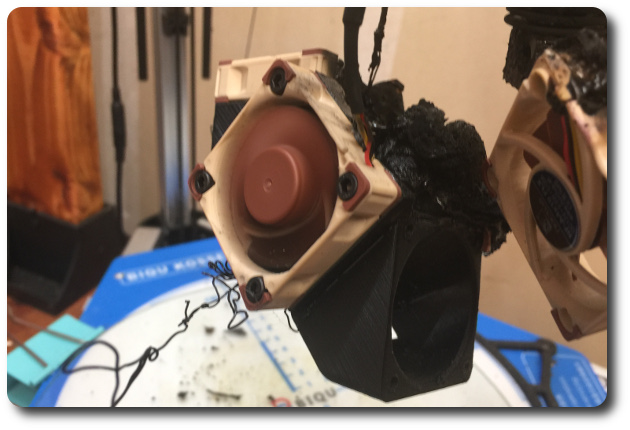
This picture is moments after blowing the fire out. I hadn’t touched / moved anything yet. Initial observations:
- The fan shroud isn’t on the hot end.
- The fairly large part that was being printed is nowhere to be found.
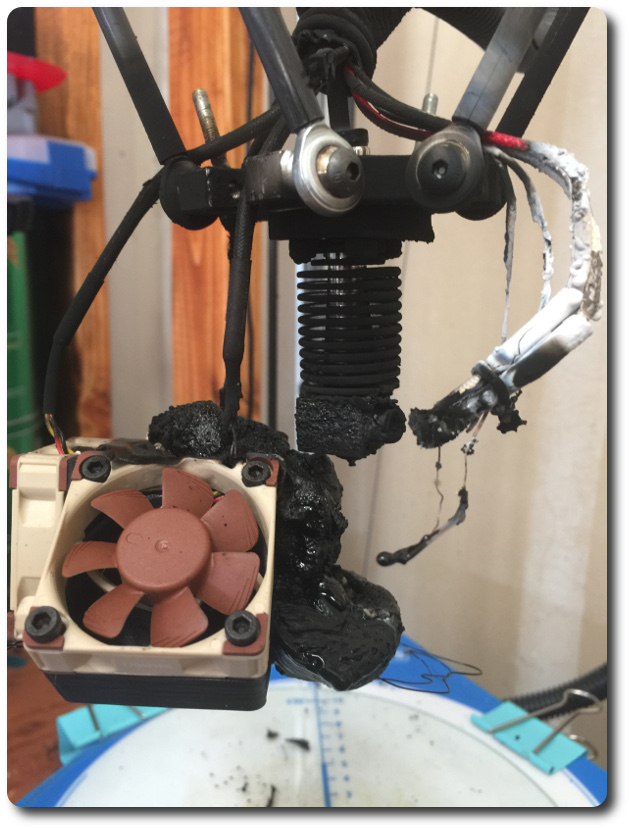
Getting in closer, we start to see things a little more clearly:
- The right side and center fans can still be turned by hand. The fire must have started higher than the fan blades.
- There’s a giant gob of plastic in the middle of the shroud. I guess that’s my printed part.
- The heater and thermistor lines are crispy right up to the aluminum effector but not above it. Looks like these were licked by the flames as opposed to causing the fire.
- The middle fan’s electrical lines look intact, while the inner insulation on the right side fan’s electrical lines is gone, but the heat shrink is intact. This suggests that the fan power lines burned from the inside out as opposed to outside in like the heater and thermistor.
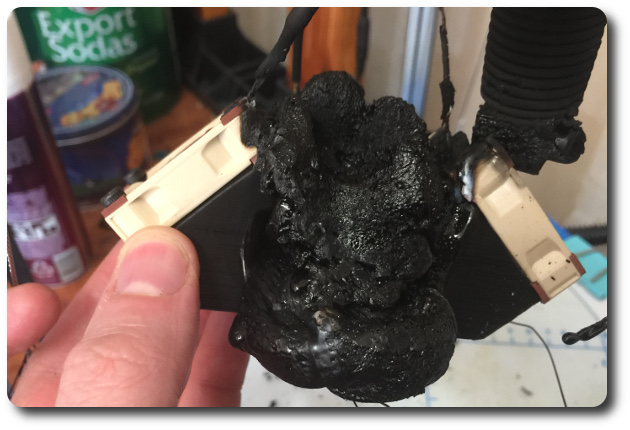
Looking at the back side where the big slot is supposed to be to fit over the hot end and heat sink:
- That’s a lot of melted/burned plastic. That’s gotta be my part.
- You can’t really tell from the picture, but that indent at the top of the big glob matches the heater block and nozzle perfectly. The heater block was stuck in the plastic glob when the fire happened, but the heat sink was not. You can also see the crusty plastic on the heater block, but only soot on the heat sink.
- The left side fan (right in the picture…we’re looking at the back) looks more damaged and also has singed electrical connections with some external heat shrink intact.
Looking at the front of the shroud:
- I removed the right side print fan which revealed both that its cowl was almost completely intact and that its electrical lines were crispy and brittle inside the woven outer sheath. Rolling the wire sheath between my fingers, I could feel the insulation crumbling inside it.
- The wiring on the center fan, however, felt fine. Fire extinguisher at the ready, I fired up OctoPrint and turned the printer on. Amazingly, the fan spun up. It’s worth noting that the center fan is wired directly to the 12V power supply for the machine. If the machine mains are on, this fan is running to keep the heat sink on the hot end cool. The side fans are both wired to the control board to most effectively cool the print or not as the slicer sees fit.
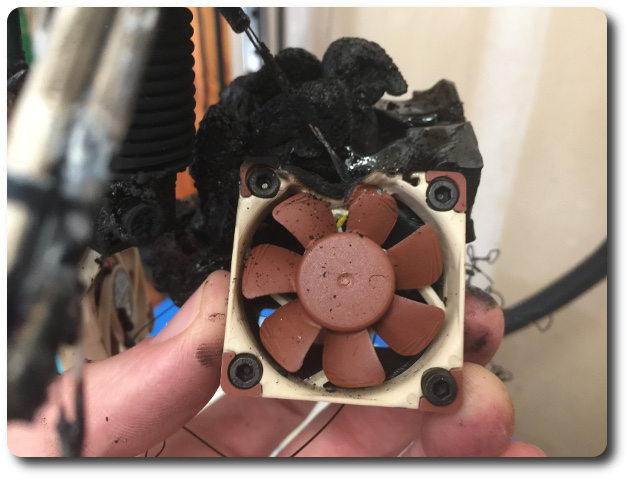
Left side print fan:
- Now things are getting really interesting. Note that the fan housing is melted right along the power wires, getting far enough into the housing to melt the blades. Also notice that the naked power lines go up into some heat shrink which is pretty much intact. More evidence that something bad happened with the side fan power lines. I should note here that both side fans are wired in parallel with the wimpy factory wiring from both running up only a few inches to a single heavier conductor which runs the length of the umbilical to the fan header on the control board.
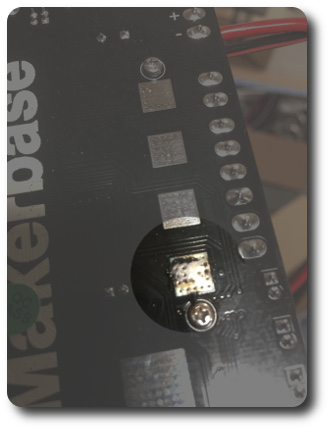
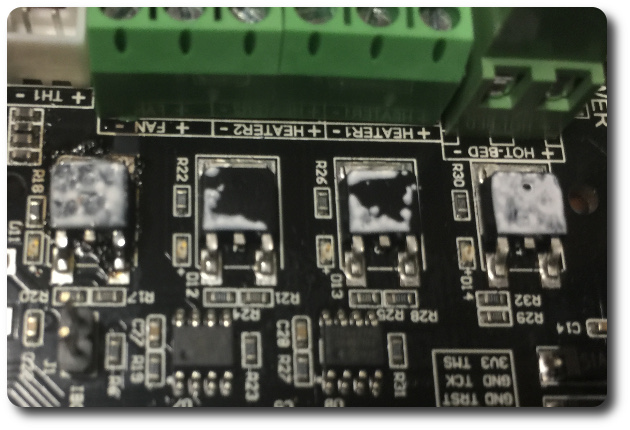
Control board:
- Looks like the
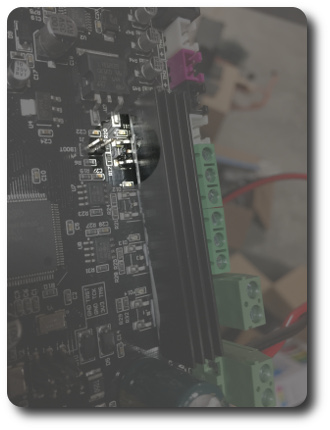
FANFET burned up. I can’t say that I’m surprised, given the condition of the electrical connections on the other end. - Note how the heater FETs have basically no thermal compound on them. I’m surprised
HEATER1(the main block heater) didn’t burn out first. - I also noticed when unhooking the control board that the main power lines from the 12V supply to the control board were stiff and had some creases in the insulation like they’d gotten hot and then cooled in whatever contorted position they were in. More evidence of entirely too many angry pixies running around wreaking havoc.
- Testing the control board after the fact, none of the stepper driver or FET outputs work. They shift from ~1.1V to ~1.5V when they should be switching 0V to 12V.
A quick experiment
No pictures of this because I would have needed at least three hands and a quick trigger finger, neither of which am I in possession of.
I disconnected the center fan from it’s heavy power line running down to the 12V supply, then took some cheap hookup wire about the same gauge as the factory power lines on the fans and shorted it straight across the beefy 12V supply line. As expected, the insulation disintegrated in a puff of noxious smoke then the cheap hookup conductor lit up like a toaster and very much looked like it would like to start anything near it on fire.
Conclusions
So where does that leave us? Somewhere in the fan circuit, but I’m not honestly entirely sure where. One potential chain of events:
- One of the side fans shorted
- Due to the short, the
FANFET failed closed, like FETs do - When the
FANFET failed, some other crap on the board failed as well, so it couldn’t move the X,Y,Z steppers, but could still drive the extruder - It continued running for several hours not moving, but still extruding filament and building up that glob of plastic.
- When the glob of plastic made it up to the glowing hot shorted fan power lines, it ignited
Unfortunately, that doesn’t line up perfectly.
- If the extruder was working after the FET blew, then why didn’t it work when testing postmortem?
- Why do both of the side fans’ power lines appear to be burned from the inside out? Even with the
FANFET failed shorted, the main supply is only 12V and they’re 12V fans.
If you have better ideas, I’d love to hear them in the comments.
Lessons Learned
- Don’t trust your printer. Only print when you’re in the same room or watching via webcam. OctoPi Just Works if you plug in a standard USB webcam. Personally, I use a Logitech C920 which is probably overkill, but makes a great video.
- Put fuses on everything. I just ordered an inline fuse box so I can independently fuse two fan runs, two hot end heater runs, the hot bed, and a master fuse between the power supply and the control board. I also picked up some of those fused, switched, C14 power supply connector thingies a while back and will be getting one of those installed as well. The factory 120V power line from BIQU is also shamefully janky.
It’s gonna be a substantial amount of work to get everything rewired and tested, so stay tuned for a new post on all that fun.