 YouTube!
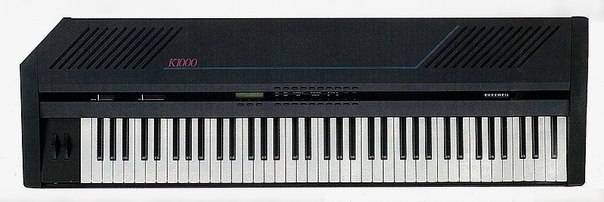
Kurzweil K1000 Keyboard Musician's Guide
Very little of the content on this page is mine. This is mostly a transcript of the official K1000 Musician’s Guide available directly from Kurzweil, edited for discoverability and navigation. Any commentary from the peanut gallery is in red italics.
Introduction
About This Manual
This manual has been designed to provide you with all the basic information you’ll need to set up and operate your new K1000 Keyboard.
Introduction provides introductory information that is of interest to every K1000 owner. Summary of Precautions is particularly important. We urge you to read it before you connect and operate your new instrument.
Connections show how to connect your K1000 Keyboard.
Operation tells how to operate your new instrument. Procedures from basic program selection to creating multi-timbral polyphony with MIDI sequencers are explained in a step-by-step fashion.
Basic Editing presents instructions for basic program editing. Here, you will learn how to create layers, keyboard splits, and to modify existing Programs; how to add pre-programmed “compiled effects” to your presets; and how to save presets to the K1000’s internal memory (RAM).
Interfacing contains technical information on interfacing your K1000 with the “outside world.”
If you are making your own cables, or if you plan to use your K1000 in professional performance and recording studios, you’ll want to refer to this section.
Specifications presents detailed technical specifications for the Kurzweil K1000 Keyboard.
The Kurzweil K1000 features the exceptional sonic quality of Kurzweil samples, coupled with the richness of digital synthesis and the flexibility of modular synthesizers. We urge you to study this manual carefully, and keep it with your instrument for reference, in order make best use of your K1000’s extraordinary musical potential. Once you’ve become familiar with the information in this manual, you’ll be ready to move on to its companion, the 1000 Series Programming Reference and begin exploring the immense creating potential of your K1000.
Thank you for your purchase of a Kurzweil K1000 Keyboard.
Unpacking & Inspection
The Kurzweil K1000 is delivered in a single corrugated cardboard shipping container. Upon unpacking your K1000, immediately inspect it for shipping damage. If it has been damaged in transit, you must place a claim with the carrier or with your Kurzweil dealer. Kurzweil Music Systems assumes no responsibility for shipping damage.
The carton should contain:
- Your new K1000 keyboard
- Two foot pedal switches
- A wire music rack
- A three-prong AC power cable
- This Musician’s Guide
- The 1000 Series Programming Reference
- A Warranty Registration Card
If any of these items is missing, contact your Kurzweil dealer.
When you first unpack your K1000, you’ll notice that there is a strip of clear plastic tape covering the front-panel label plate. Its function is to protect the plate from scratches when the unit is being packed. You’ll find that it peels off very easily.
We recommend that you save the shipping carton and protective inserts. For carrying and shipping, they provide the best protection short of a custom-made road case.
Summary of Precautions
- Keep this Musician’s Guide and refer to it whenever you connect and operate your K1000 Keyboard.
- Make sure that your AC power connection conforms to the guidelines given in AC Power.
- To protect against shock hazards and ensure proper operation, never cut or disconnect the power cable ground pin. Don’t use the power cable if it appears frayed.
- If the fuse in your K1000 should blow, you must replace it with another of the same physical size and current rating. Never use a fuse with a higher rating, and never attempt to bypass the fuse with a hardwired connection.
- The Kurzweil K1000 is normally shipped ready to operate with a mains AC voltage of 100 to 120 volts. If your local AC service is 200 to 240 volts, you must set the unit for the higher voltage. Follow the procedure given in AC Power. Attempting to operate the K1000 at 200-240 volts AC without properly setting the voltage selector switch will cause extensive damage to the unit.
- Do not open the K1000 case. There are no user-serviceable parts inside. Refer servicing to an authorized Kurzweil Service Center. lol.
- Do not spill liquids into or on the K1000 chassis.
- Do not allow the K1000 to overheat. The K1000 Keyboard will operate at temperatures from 0-55°C (32-131°F). Make certain that your setup allows adequate ventilation to maintain this temperature range.
- Do not connect the audio outputs or MIDI connections to a voltage source such as a battery, power supply, mains AC source or amplifier output.
- Use only standard MIDI cables for MIDI connections. Do not use ordinary recording studio DIN cables. If you are uncertain how a cable is wired, don’t use it.
- If you try a Hard Reset, be sure to press only the VALUE buttons, and no others, when you turn the Expander back on. Pressing any other buttons while powering up may cause the unit to lock up.
Description of Features
The Kurzweil 1000 Series
The Kurzweil 1000 Series is an integrated line of powerful, cost-effective electronic musical instruments for live performance and recording. Combining both sample playback and digital emulation of a traditional modular synthesizer in a single unit, each 1000 Series instrument offers prodigious programming flexibility and sonic variety.
The 1000 Series comprises four rack-mounted expander modules and a keyboard model. All are multi-timbral, and ar capable of responding to information on all 16 MIDI channels in any combination. The full line:
1000 PX Professional Expander – A 24-note ployphonic module featuring 120 presets ranging from Grand Piano and Strings to Choir, Organs, Acoustic Bass, Vibes, Woodwinds and Brass.
1000 Sx String Expander – A 20-note polyphonic module offering 99 preset sounds, from Professional Ensemble Strings to Solo Violin, Solo Cello and Pizzicato Strings.
1000 HX Horn Expander – A 20-note polyphonic module packed with 100 presets including Trumpet, Trumpet Mutes, Trombones, Saxophones and many others.
1000 GX Guitar Expander – A 20-note polyphonic module with a wide variety of acoustic and electric guitar timbres.
K1000 Keyboard – A 24-note polyphonic keyboard instrument combining 115 of the voice presets of the 1000PX with a weighted 76-not keyboard, dual pedal switches and three 10-location programmable memory banks.
The Kurzweil 1000 Series inherits the sonic legacy of the legendary Kurzweil 250®, the sampling keyboard whose extraordinary fidelity and realism have made it a mainstay of professional music. Through VLSI (Very Large Scale Integration) integrated-circuit technology, Kurzweil engineers have succeeded in packing each 1000 Series instrument with up to 120 preset Programs based on 16-bit floating-point digitally-sampled sounds. As a result, identical voices played on the Model 250 and on a 1000 Series instrument are virtually indistinguishable from one another.
1000 Series instruments also incorporate extensive programming features, including both Compiled Effects (pre-prorgammed, adjustable effects such as Chorus, Vibrato, Tremolo and Leslie) and Modular Effects (the digital equivalent of a traditional modular synthesizer, with complete user control over patch configuration and settings). User-created Programs may be stored in any of 64 RAM (Random Access Memory) locations; the RAM is battery-backed so that user programs are retained when the instrument is turned off or unplugged.
You may also use ObjectMover™ software to dump Programs and other items to your personal computer. ObjectMover is available from your Kurzweil dealer. Information on programming 1000 Series instruments is found in the 1000 Series Programming Reference.
Each 1000 Series instrument features a comprehensive and flexible MIDI implementation, with full user control over channel assignments, controller assignments, program change mapping and other parameters. Any of the instrument’s voices may be assigned to any of the 16 MIDI channels for multi-timbral payback of sequences, and intelligent allocation of notes minimizes “note stealing.” Finally, a unique, built-in MIDISCOPE function allows the instrument to provide a dynamic display of MIDI events as they are received, and self-diagnostic routines help to pinpoint malfunctions, should the occur.
K1000 Structure
The Kerzweil K1000 Keyboard is a multi-timbras instrument which allows flexible creation of split and layered timbres in many combinations. An individual timbre, or a fully-defined split and/or layered timbre setup, is termed a Program.
The K1000 is furnished with a large number of preset Programs which reside in ROM (Read Only Memory). Each Program has a unique name (for example, Grand Piano or Jazz Organ) and a uniquely numbered memory location. Factory Programs are stored in memory locations 001-063 and 128-179.
Factory Programs cannot be erased; ROM is a permanent storage medium. They may, however, be modified by the user, and the modified Programs may be renamed and stored in RAM. The user RAM locations are numbers 064-127.
A Program may have up to four individual Layers. Each Layer may have its own Soundfile, or timbre, assigned to it, and each also may have a distinct set of Effects applied to that timbre.
Individual Layers can be assigned to respond to any range of keys on the K1000 keyboard (or that of a separate MIDI controller), and the key ranges for successive Layers of a Program may or may not overlap. Programs having Layers whose key ranges do not overlap are referred to as Split Programs.
Front Panel Controls & Display
As the K1000 front panel graphics indicate, several of the control buttons serve different functions depending upon the instrument’s operating mode. The K1000 has two basic operating modes: PLAY and EDIT. For each button whose action changes with the operation mode, the upper label indicates its PLAY mode function and the lower its EDIT mode function.
| Button | Play Mode | Edit Mode |
|---|---|---|
| PLAY / EDIT | Select Edit Mode. | Select Play Mode. |
| MODE / LAYER | Select MIDI receive mode (Omni, Poly, or Mult). | Scroll through the layers in the current Program. |
| CHANNEL / MENU | Cycle through the 16 MIDI channels, whapping at either end (for example, pressing the Down button when channel 1 is selected takes you to channel 16). | Access the various Edit Menus. |
| PROGRAM / PARAMETER | Cycle through the numbered Program memory locations, wrapping at either end. | Select specific programming Parameters. |
| VALUE | No function unless the K1000 is set for Mult mode play; in this case, they act to enable or disable the currently displayed MIDI channel. See Disabling & Deassigning Channels. | Alter the value settings of Parameters (YES/UP increases the value, and NO/DOWN decreases it) or to respond to question prompts from the K1000 (for example, “Delete Program?”). |
Note – If you press and hold a button, its action will begin repeating rapidly after a brief interval. You can use this feature to move quickly through the range of a button’s action. With the three sets of dual buttons, pressing both at the same time will jump to frequently-used functions, or wrap from high to low limits of ranges.
DISPLAY – This back-lit, two-line, 32-character LCD (Liquid Crystal Display) indicates the current status of the instrument. In EDIT mode, it displays Menu choices, Parameter values and prompts. The Display also functions as a power indicator.
VOLUME – This slider controls the K1000 audio outputs.
DATA ENTRY – This slider provides a quick method for entering Values in Edit mode.
Pitch Wheel – This spring loaded, center-detent controller is used primarily to bend notes. Its range and action are programmable. See the 1000 Series Programming Reference.
Modulation Wheel – The Mod wheel is also center-detented, but is not spring-loaded. It usually controls depth of modulation, but may be programmed to control other functions.
The K1000 calibrates its controls when power is applied, and the position of the Mod wheel at that time becomes its zero point. Be sure that the Mode wheel is at center before you turn on the K1000.
A, B, C – These buttons select the K1000’s Program Memory Banks. See Exploring Programs.
Numeric Buttons – These buttons select locations in the Program Memory Banks. In conjunction with ENTER, they also may be used to access Programs directly by number.
ENTER – Used with the numeric buttons, this button allows access to Programs without using the PROGRAM button to scroll through long lists.
STORE – This button stores Programs to the Program Memory Banks for quick access in performance.
Rear Panel Controls & Connections
AUDIO OUT – The K1000 is provided with tow outputs labeled LEFT and RIGHT, respectively. The connectors are standard 1/4-inch monophonic phone jacks.
PEDAL – The K1000 pedals connect to these 1/4-inch phone jacks. Normally, Pedal 1 controls Sustain and Pedal 2 Sostenuto. The pedals’ functions are programmable.
_The K1000 calibrates its pedals when power is applied. If you hold a pedal down when turning on the K1000, its action will reverse. Be sure that the pedals are in the proper position when you turn on your K1000.
MIDI IN – This port receives data from a MIDI control source (such as another keyboard or a computer sequencer).
MIDI THRU – When MIDI data are received at the MIDI In port, the K1000 echos the data at this port. The Thru port is used to chain MIDI devices together.
MIDI OUT – This is the K1000’s output port for transmitting MIDI data to other devices. See MIDI Operation.
AC Power Inlet – This three-pin NEMA connector mates with the power cable supplied with the K1000 Keyboard. To ensure safety and proper operation, do not use an ungrounded power cord with your K1000.
POWER – This rocker switch controls AC power to the K1000.
Fuse Compartment – Your K1000 is protected by a 1 Amp, 125 volt fuse. To open the fuse compartment, remove the power cord and gently pry the compartment cover outward with a flat-blade screwdriver.
WARNING: Never substitute a fuse with a higher rating, and never attempt to bypass the fuse.
Please read this section carefully before you set up your K1000 Keyboard. When making connections, be sure to follow the precautions given here and in Summary of Precautions.
The recommended sequence of steps for connecting your K1000 is:
- Make certain that your K1000 is set for the correct AC line voltage. If not, follow the instructions in the next section.
- Plug the power cord into the AC Inlet of the K1000, then connect it to a grounded AC outlet.
- Connect the K1000’s audio outputs to your sound system.
- Connect the K1000’s MIDI Out to the MIDI input of the next instrument in your setup (optional).
- Turn on the K1000 (it takes about 3 seconds to power up), then turn on your sound system.
The specific information that you need to perform these steps is given in this chapter. Refer to the figure below when you make your connections, and be sure to keep track of the Left and Right audio channels.
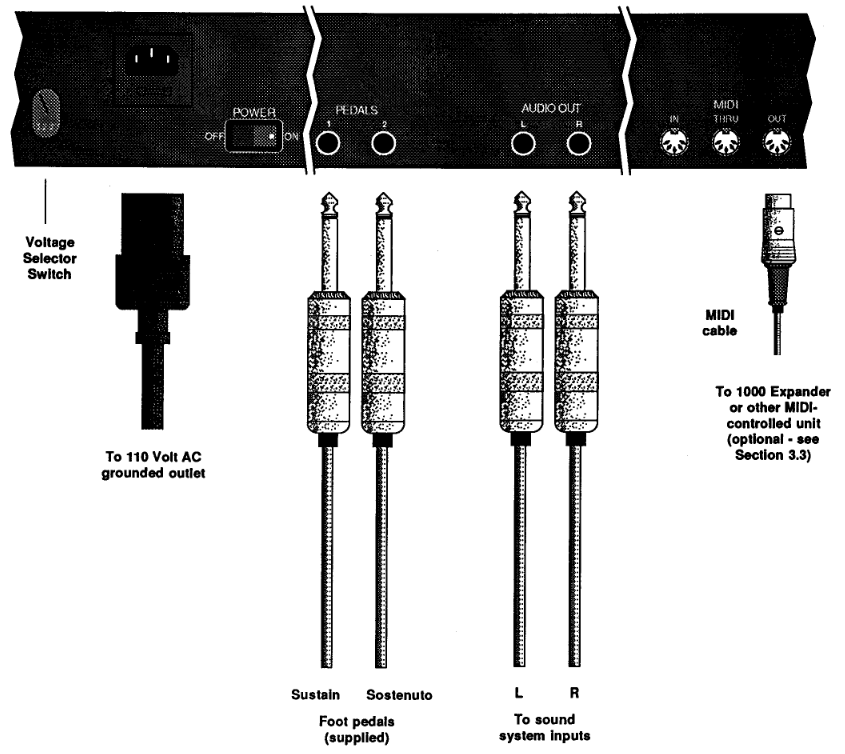 Figure 2-2 Connecting the Kurzweil K1000 Keyboard
Connections
AC Power
Before connecting your K1000, check to be sure that it is set for the correct line voltage. The line valtage selector is located on the rear panel, at the end nearest the AC power inlet. (See figure above.) Its setting is visible through a small opening in the panel.
To change the setting, insert a flat-blade screwdriver through the opening into the switch slot. Turn it gently clockwise until the switch clicks into place, then remove the screwdriver and inspect the switch to be sure that its setting corresponds to the local line voltage.
Caution: Attempting to operate the K1000 at 220 volts without setting the voltage selector switch properly will seriously damage the unit.
Your K1000 is supplied with a three-prong power cable, and will operate best if it is connected to a grounded AC outlet. This type of outlet is standard in the United States and is now quiet common, although older buildings may have simple two-prong ungrounded outlets.
If your outlet is not furnished with a ground pin, you will have to use an adapter, as shown in the figure below. You can purchase adapters like this at any hardware store. Notice that the adapter’s ground wire (or lug) must be attached to the outlet plate mounting screw. Don’t cut or break off the ground pin on your K1000’s power cable.